Monday, May 30, 2011

Simplifying Migration Process – Changing Environment Specific Variables in RPD


When it comes to migrating repository file between environments (Dev – TEST-Prod), one of the common questions from OBIEE environment administrators is if there is a way to change the connection information without having to change them manually in all the places.
Creating repository variables for DSN and DSN Username solves the issue to an extent. However, imagine having to deal with changing multiple DSNs and their respective usernames. Moreover, there is the setting password to the DSN username. One way to automate the setting of the variables is to store the values in a file and set them via admin tool command line mode.
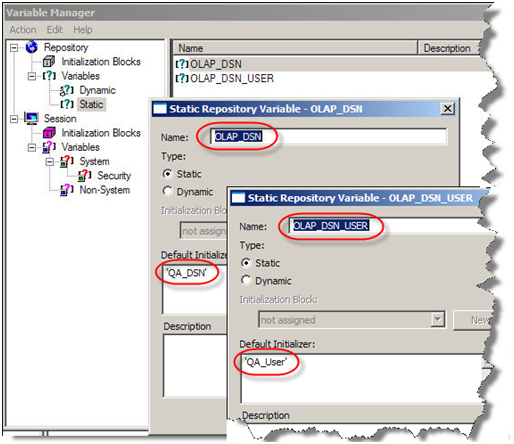
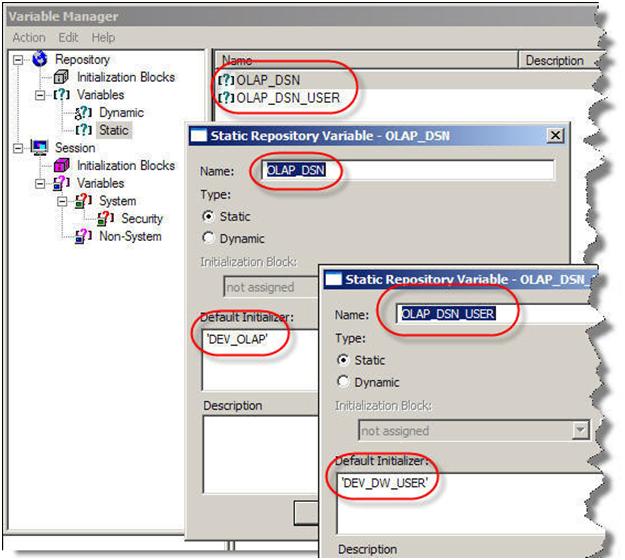
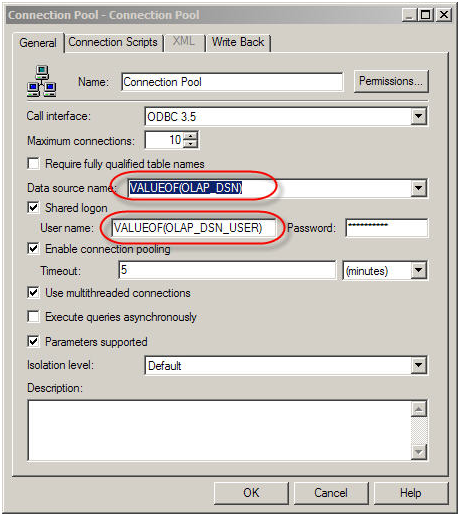
First, define repository variables that can be used in the connection pool.


Reference the DSN information in the connection pool.

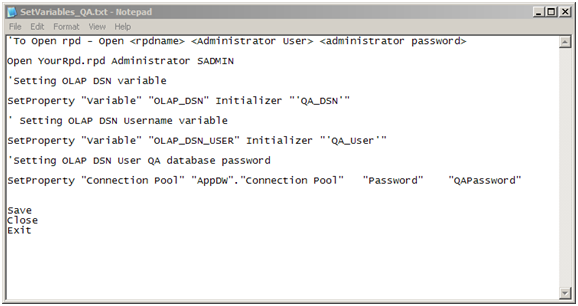
Now create a control file SetVariables.txt with the environment specific values.
_______________
‘To Open rpd – Open <rpdname> <Administrator User> <administrator password>
Open YourRpd.rpd    Administrator     SADMIN
‘Setting OLAP DSN variable
SetProperty    ”Variable”    ”OLAP_DSN”    Initializer    ” ‘QA_DSN’ ”
‘ Setting OLAP DSN Username variable
SetProperty    ”Variable”    ”OLAP_DSN_USER”    Initializer    ” ‘QA_User’ ”
‘Setting OLAP DSN User QA database password
SetProperty “Connection Pool” “AppDW”.”Connection Pool” “Password” “QAPassword”

Save
Close
Exit
______________

Create one per environment.
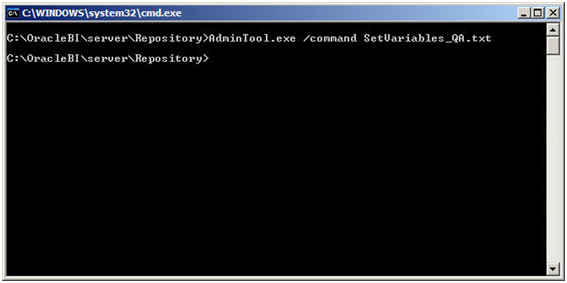
In the command line run the following command:
AdminTool.exe /command SetVariables_QA.txt

And the repository is now prepped for the other environment (QA in this case).


OBIEE Presentation Layer Design Principles/Best Practices


There are certain design principles or best practices oracle suggest in designing the OBIEE repository. If you open any standard/sample repository provided by oracle you will understand what exactly I am talking about
Today we will discuss the design principles for Presentation Layer.
Principle 1.Subject Areas
Do not include all presentation layer objects in a single subject area (Presentation Catalog). While it is possible but still not recommended approach.
Principle 2. Development with End Users in Mind
Always develop the presentation layer so that end users are able to understand and use it.
Principle 3. Role Based Subject Area.
It is always good idea to create presentation catalog to suit the needs of individual users or user types. For ex. create a separate presentation catalog for sales managers because they need to see only an overview of an organization.
Principle 4. Presentation Tables
Presentation Tables should consistent across presentation catalog.
  • List Dimension tables first.
  • Do not mix dimension and fact columns in the same table.
  • Apply consistent ordering and naming conventions for tables and columns across catalogs.
  • Include the words “measure” or “fact” in the names of the fact presentation tables.
Principle 5. Rule of Seven
Keep presentation catalogs small and easy to understand by limiting the number of tables to seven.
Keep Presentation catalogs small and easy to understand by limiting the number of columns to seven.
Principle 6. Fact Tables
Try to limit the presentation catalogs so that there are no more than a couple of fact presentation tables in each catalog. It is important to avoid situation in which there are multiple join paths existing within one presentation catalog.
Principle 7. Implicit Fact Columns
If you have multiple fact presentation tables, it is always best practice to assign an implicit fact column. Implicit facts come into play when an Answers report contains columns from more than one logical dimension table and no explicit facts.
Principle 8. Canonical Time
Canonical time is a useful way for allowing users to report for a specific period of time across multiple star schema. If you use canonical time ,make sure that the corresponding time presentation table is given a very generic  name and that name is consistent across all the presentation catalogs.
It should be the first table in a catalog.
Principle 9. Secondary Time Dimension
This function enables users to build time reports for specific star schema.
Secondary time dimensions can be given their own presentation tables further down the list.We can place all secondary time dimension objects into a single presentation table.
Principle 10. Nesting Presentation Table
Prefix presentation table names with a hyphen to group common objects together into sub folders.
Principle 11. Presentation Object Names & Description
  • Use the Alisa tab to keep track of prior names.
  • Use the default option that synchronize the presentation column name with the underlying logical column name.
  • Use only logical, business -oriented names ( rather than physical object names) in the presentation Layer.

OBIEE Physical Layer Design Principles/Best Practices


There are certain design principles or best practices oracle suggest in designing the OBIEE repository. If you open any standard/sample repository provided by oracle you will understand what exactly I am talking about
Today we will discuss the design principles for physical layers
Principle :Import only needed tables in physical layer and do not create tables manually in physical layer.
Import Tables
Import Tables
Reasons to do that :Its easier to import the table then creating it manually.In that way we are avoiding the table name , column name , data type mis match possibility. Import only those tables which you need. If you need more tables at later stage in project, you can always import them.
You will be using connection pool to import the table and that helps to make sure that connectivity to source database system is working fine.
Principle 2 Create alias for the physical tables
Physical Layer Alias Table
Reasons to do that :
It helps in avoiding the circular joins.
It helps when we have confirm dimension(e.f time dimension) and we want to join dimension different way
Its easier to give the access of objects to users in case of Multi User Development Environment
Alias naming convention helps in easily finding the fact and dimension table in physical layer
We can import the key relationship in physical layer from database and maintain the relationship which is required among the alias tables
Principle Set the cache  property of the physical table
Cache Property of the tables
Reasons to do that
Its better to set the caching at physical table level and not at the alias table level.This applies to most of the scenarios
It your data source is OLTP system make sure you disable to caching. As  that changing frequency would be high and you do not want to cache results.
For all the data warehouse sources have better cache persistence time set
Principle 4 connection pool(s) and its properties
Physical Layer Multiple connection Pool
Reasons to do this.
To have multiple connection pool for difference purpose. e.g for usage tracking, security implementation etc it better to have different connection pools.
COnnection Pool Property
Call interface: Use native call interface for the connection(e.g OCI10g) etc based on source database. Its faster then generic ODBC connection.
set connection pool , time out ,maximum connections etc based on server configurations and usage
connection pooling- it avoids the database connection overhead. If users run the same query it users the same connection from the pool. What does this mean is user sessions share the connection in this.
Maximum Connection :
Max what it should be :Approx 1024 kb of server memory is consumed in each connection.So tThis has to be set per server configuration and requirement.
Min what it should be: 25% of max users times the reports they execute.
e.g if you have 1000 users accessing around 10 reports  in dashboard that this number should 250 ( 25% of 1000) * 10 = 2500
Please leave me a comment if you have lean any other design principal as a hard lesson in your projects

OBIEE BMM Layer Design Principles/Best Practices


OBIEE BMM Layer Design Principles / Best Practices
There are certain design principles or best practices oracle suggest in designing the OBIEE repository. If you open any standard/sample repository provided by oracle you will understand what exactly I am talking about
Today we will discuss the design principles for BMM Layer.
Principle 1. Use Multi User Development Environment
Use the Multi- User Development  facility if there are multiple developers. Multiple developers to connect “online” to the same repository file and making changes is not recommended.
Multi User Development allows user to define a series of projects within the repository file ,where each project is a subset of the entire repository .If developers want to make changes , they can check out a project to a local machine make and test the changes,and then check the modifications back into the master repository file.
Principle 2.  Always run Global Consistency Check before releasing a repository.
Whenever we make changes to a repository ,always be sure to run Global consistency check. It is bad practice to release a repository that still contains consistency check errors. In some cases, consistency errors prevent Oracle BI Server from loading the repository. Use the Consistency check manager to identify and debug check messages.
Principle 3.  Separate Business Model
Even if you have only a single data source or schema in the physical layer, or you have only one physical data source for the repository, it is still good practice to break out the physical objects into multiple business models in the BMM layer to represent the independent areas of functionality.
Principle 4. Logical Tables
When building logical tables, do not merge multiple dimension tables into a single logical dimension table,and do not merge multiple fact tables into a single logical fact table.
Having multiple logical fact tables also makes it easier to create well defined projects for Multi User development.
It is also a good practice to prefix logical table names with either Dim-, Fact- ,or Fact Compound -.
This allows you to easily see how the tables are being used. It also groups the tables in the business model, so that facts are groups with facts, dimensions with dimensions  and so on.
Principle 5. Time Dimension
There are few things to keep in mind in time dimension factor.
  • Always must ensure that time Dimension hierarchy is built correctly and the logical level of each time- logical table source is set correctly
  • If there are multiple time dimensions within the business model, for consistency, make sure that all time dimension logical table contains the same columns and general structure. This is good for reporting purpose.
Principle 6. Logical Fact & Dimension table columns
  • Always assign a primary key for logical dimension tables. All logical dimension columns should be renamed in a way that is meaningful to users.
  • Bring only required columns in to the BMM layer for reporting.
  • Do not assign logical primary key for logical fact tables.
  • Create meaningful name for measures
  • Set aggregation rule for every logical fact columns.
  • Create “dummy” measures to group facts.
Principle 7. Logical Joins
Use only logical(complex ) joins in BMM layer. And always accept default properties when creating joins.
Principle 8. Calculated Measure
Be very careful when building calculated measures.
  • Use logical columns for calculations that require an aggregation rule that is applied before the calculation.
  • Use physical columns for calculations that require an aggregation rule to be applied after the calculation.
Principle 9. Aggregates
Few important things to keep in mind about Aggregates.
  • Try to ensure that each aggregate table has an effective summary ration with underlying detail.
  • Ensure that the logical level of every aggregate logical table source is set correctly.
  • Always test to ensure that aggregates tables are being used as expected.
  • If an aggregates is not used ,try changing the number of elements on one of the related logical dimension levels.
Principle 10. Dimension Hierarchies
In Dimension Hierarchies few things  are very important to keep in mind
  • It is best practice to create dimensional hierarchy for every logical dimension table in BMM layer.
  • All Dimension must have at least two levels : the total level and detail level.
  • If you are creating Dimensional Hierarchy manually, be sure to check Grand total level for the Total Level.
  • Use Update Row Counts or Estimate Levels to set the number of elements for every level of every Dimension Hierarchy.
  • Think about the experience of user when enabling drill down.
Principle 11. Avoid Snowflake schema
When there is Snowflaking in physical model,We should try to avoid Snowflaking in BMM layer and build models that use only star schema .
Use WHERE clause filters to help avoid using opaque views or complex joins in the physical layer.
Authentication In OBIEE


OBIEE Support four types of authentication.
1)LDAP Authentication : Users are authenticated based on credentials stored in LDAP.This is the BEST method to do authentication in OBIEE and it supports company’s Single Sign On (SSO) philosophy as well.
2)External Table Authentication : If users belongs to multiple groups ,that information is being pulled from the data base scheme table.This usually implemented with LDAP Authentication
3)Database Authentication: The Oracle BI Server can authenticates user based on database logins. If a user has read permission on a specific database.Oracle BI Presentation Services authenticates those users
4)Oracle BI Server User Authentication: User are directly crated in OBIEE and are authenticated against those credentials. This is the worst authentication method if company has larger then few people using the system. Believe me Maintenance is a nightmare here.
Two authentication methods are usually combined together.like LDAP and external table authentication.
And as i said earlier LDAP and/or LDAP with external table are BEST authentication(Again each case is different)
Oracle BI Server User Authentication is not quite popular as it has its support/maintenance issue associated ,once system grows beyond certain users

Tuesday, May 10, 2011

Hide dashboard prompts/Section in OBIEE


There is a way to hide the dashboard prompts in OBIEE.
But, need to have a separate section containing this prompt.. that’s reason i made my article title as: prompt/Section 
Here is the way..
1. Edit Dashboard, go to Properties of Section > Format Section..
2. Expand Custom CSS Style Options (HTML Only) then select Use Custom CSS Style check box… and write the following code as shown:
display:none;


It's more effective then collapsible option.. 

Monday, May 09, 2011

One Dimension – Multiple Hierarchies


There was a question yesterday on the forums regarding the usage/availability of Multiple Hierarchies for a single dimension. I thought i would blog about it since there is very little documentation on this. Now let us take an example and try to understand what multiple hierarchies are and where they are used. Classic example for this would be the Time Dimension. In time dimension we can have a hierarchy based on Calendar Year, Quarter, Month and Day and the Fiscal Year, Quarter, Month and Day. BI EE can accommodate such possible multiple hierarchies within the same dimension. Let’s try to build one for a Product Dimension. There are certain ground rules for building multiple hierarchies for the same dimension.
1.   There must be a unique key for the dimension at the lowest level.
2.   This unique key must be shared by all the multiple hierarchies i.e. all the hierarchies should have their last levels as a level with the unique key.
3.   All the hierarchies should roll up to the top Total Level. And Top Level attributes should not have a Logical Key defined.
In our case, we have a unique key called DIMENSION_KEY which would form the last level. Our aim is to build 2 hierarchies like this

               Total Level
   Pack Size                  Category
   Products                    Sub-Category
               DIMENSION_KEY
i.e
Hierarchy1 = Total Level -> Pack Size -> Products -> Unique Dimension Key
Hierarchy2 = Total Level -> Category -> Sub-Category -> Unique Dimension Key 

As you see above DIMENSION_KEY is a shared level by both Products and sub-category. Now let’s start building the hierarchy.


Once we have reached till the 3 level for both the hierarchies, create a child level for the level Sub-Category. The child level would be DIMENSION_KEY.
After this create a Shared Child Level for the Products level and use the DIMENSION_KEY for this shared level.

Now we have basically created a dimension containing 2 hierarchies. Just test it out to see whether you get the proper drill downs.


Thursday, May 05, 2011

Changing Default views of Compound Layout

changing the default views of Compound Layout in Answers. So, basically if you go to answers and create a new report, you would find that by default Compound layout would have 2 views included i.e. Table and Title views as shown below 

But what the customer basically wanted was to include a filter and table view by default (i.e. filter view instead of title view). The method is given in the bookshelf. But unfortunately it does not work as specified due to a documentation bug. In order to make this work, go to {OracleBI}\web\msgdb\messages folder and you would find a file called answerstemplates.xml.  Copy this file to {OracleBIData}\web\msgdb\customMessages. If you don’t have these folders then create it. Now edit this file and search for kuiCriteriaDefaultViewElements. This is the message that handles all the default values possible in Answers. Now add the following tags to this message after the HTML tags,

<view signature=”compoundView” >
<cv signature=”tableView” />
<cv signature=”filtersView” />
</view>


Once this is done restart your presentation services. Now you would see that by default you would have got Table and Filter views within your compound layout.


If you notice, the methodology above is same as the one that we followed for enabling the sorting of reports in Dashboards. So, use this methodology when you want to modify any custom XML messages.


Tuesday, May 03, 2011

Import Through Server


If you open the Administration Console and go to import, you would basically find 4 options. They are
1.   Import from Database
2.   Import through Server
3.   Import from Repository
4.   Import from XMLA
The options 1,3 and 4 are pretty self explanatory. But so far i have never used the Import through Server option. This option again has some interesting features. And this works only if you have open a repository in the online mode. Let us try to understand this here. Consider that we have 2 machines A and B as shown below.

So in effect an user in Machine B is opening the repository in the server machine A in online mode. So, let’s see what happens when we open Import from Database.


As you see when we click on import from Database it shows all the set of System DSNs that have already been created in Machine B(local to Machine B). So, now lets see what happens when we click on Import through Server


The list of DSNs have changed, havent they? So what Import through Server does is it exposes the Machine A’s DSNs, TNSNames entries etc to Machine B. So, any user who is involved in the repository creation process does not have to create local DSNs or TNSNames entries. All they have to do is to connect to the repository on the Server(in Machine A) in online mode and then click on Import through Server. This is very much used in the Multi User Development of the Repositories.


Monday, May 02, 2011

How to reduce the space between multiple pivot tables placed side by side

1. Provided that s_oracle10 is in use; backup the following files before editing them
- C:\OracleBI\web\app\res\s_oracle10\b_mozilla_4\views.css
- C:\OracleBI\oc4j_bi\j2ee\home\applications\analytics\analytics\res\s_oracle10\b_mozilla_4\views.css
2. Set the following section in both files above:
.PTSectsTable
{
border:none;
border-spacing:0px;
padding:0px;
margin:0px;
}
3. Restart the OC4j and the Presentation server

Setting LOGLEVEL from Answers


Normally, we check query in NQQuery.log file or from Answers also we can check the query directly.
 Difference is: NQQuery.log contains all the queries and need to identify them by time the report run.
If it’s directly from Answers (go to Settings > Administration > Manage Sessions), log available for every report runs until the query is changed.
 For every query of report there will be created one cursor, by accessing the cursor you can see the physical query generated by BI server.
 If we are unable to see the log file or if we find any error message saying that, No Log found while trying to watch the query in log the first step in the mind is to check the LOGLEVEL. When creating rpd by default, loglevel takes 0 values for Administrator user.
If it’s set to 0, we go for 2 or 3 accordingly, such that, the query will be appeared.
For suppose, if you are accessing presentation service of another system and unable to see the query. You need not to set the LOGLEVEL=2 in the rpd presented in another system.
I am assuming that all cursors are closed and LOGLEVEL is zero for particular user.
Log into answers with user who has LOGLEVEL =0, run any report then go to Settings > Administration > Manage Sessions. Click on View Log option.
You will have error message or you may open the view log but you can’t find the query run at this moment because of loglevel – “0″. (To test this error message, you better delete the content of NQQuery.log completely but before doing this you need to stop your BI Server service then clear the content and save file again start BI Server service)


Close the window as well as cursors
 Just go to advanced tab of particular report.


Scroll down to see the option: Prefix
Here write SET VARIABLE LOGLEVEL=2; (semi-colon at the end is must)


Now click on Results tab to re – run the report.
 Now you go Settings > Administration > Manage Sessions
Click on View Log to view the query. Now you are able to see the query and according to the LOGLEVEL – 2
 Go back to Advanced tab, observe the Logical query.
Before SQL, you find the text you written in Prefix field.
By mentioning the semi colon, BI Server executes these statements one after another.
This post explain you, how to set loglevel from answers itself, without going to rpd,
This process overrides the loglevel set in the rpd.