Wednesday, June 01, 2011

OBIEE 10g Web Catalog "Best Practices"


I was working with an Oracle Partner last week who asked me to QA their OBIEE project. One of the areas I took a look at was their web catalog setup, and I was asked to come up with some “best practices” around web catalog design and maintenance. As my speciality is more the server and data-side of OBIEE, I asked around some of my colleagues and pulled together this list of web catalog best practices. Thanks to Pete, Ragnar, Mike and Borkur for their tips, and of course if you’ve got any other best practices, or disagree with what we’ve come up with, just add a comment and we’ll incorporate the feedback. Anyway, here we go…

1. When starting on a new project for a new client, make sure you create a new web catalog.

This goes for the RPD as well. As John Minkjan pointed out a few months ago, it’s not good practice to build off of the Paint or Sample Sales demo RPD, and the same goes for the web catalog. To create a fresh, new web catalog, first create an empty directory within the $ORACLEBIDATA/web/catalog directory where the BI Presentation Server is installed, like this:
Sshot-1-2
Then edit the $ORACLEBIDATA/web/config/instanceconfig.xml file to point to this new directory.
Sshot-2-2
Then stop and start the BI Presentation Server service (from the Services applet in Windows, or using the run-saw.sh script under Linux/Unix). When the Presentation Server sees the empty directory, it will create the necessary folder structure within it, giving you a nice, clean web catalog to work with.
Sshot-3-2
You can now create reports, dashboards and so on in here, without any of the demo items from Oracle cluttering things up.

2. Create catalog groups and folders for each area of analysis within the web catalog.

In terms of the folder structure within the web catalog, we tend to leave the users folder to itself (the Presentation Server creates a folder for each user that registers in the web catalog), the system folder to itself (the Presentation Server looks after this), and concern ourself instead with the shared folder.
How you structure sub-folders under the shared folder really a question of how the system will be used. If you’ve got just a single user community for your system, you might create one folder per dashboard, and place all the requests used by that dashboard within that folder, keeping things simple for when you want to apply security. Typically though, you will have a number of departments or functions that are using OBIEE, and so you will usually want to create web catalog “groups” and “group folders” per department or function. The simplest way to create these groups is to use the Add/Edit Group function with the web-based Presentation Services Administration screen.
Sshot-9-1
According to the instructions on this screen, it should also create the corresponding group folder as well, but when I tried it the folder wasn’t there. Therefore you may need to separately create the group folder using the Catalog Manager, just under /Shared, to hold that group’s dashboards and requests.
Sshot-10

3. Create a “Corporate MI” folder for “gold standard” reports

If you have a “Corporate MI” portal where individual departments publish and maintain data, you might want to create another group folder to hold these dashboards. Then, departments can develop their own “private” dashboards and requests in their own group folders, and promote them to the Corporate MI dashboard using an approvals/change control process. These dashboards and requests can then become “gold standard” or “kite marked” authoritative sources within the organization, whilst giving departments the ability to create reports specifically for their own purpose (this blog post by Phil Wright contains some good suggestions around report governance, user acceptance and BI portals in organizations).
Sshot-5-1

4. Enable drop-down menus for dashboards within each catalog group.

Each department can then set up it’s own dashboards, requests, alerts and filters within its own shared, group folder (or indeed, create subfolders for specific areas of analysis). If departments end up creating lots of dashboards, the Presentation Server will automatically show them in a drop-down list with the group folder as the menu name once the number of visible dashboards for a user is fifteen or more. You can control this setting by adding a <DashboardMaxBeforeMenu> tag to the instanceconfig.xml file; I typically set it to 1 on real projects so that all departmental dashboards are shown in drop-down menus.
Sshot-6-1
Then when users view the dashboard, all of the dashboards are clearly grouped by function.
Sshot-7-1
Note that dashboards can only normally be placed in these top-level, group folders (within the _portal subfolder), and you get the choice of which group folder in which to place your dashboard when it is initially created.
Sshot-8-1
These group folders can then be used to hold the requests associated with each group’s dashboards. If you like, you can store saved filters either directly in these group folders, or in a special “Filters” sub-directory under the corresponding group folder.

5. Enable permissions and security within the web catalog.

If you followed the process above, you will have web catalog groups and corresponding group folders in which you will store their dashboards. reports, alerts and filters. To secure access to these groups, ensure that their names correspond to your groups in the RPD or your LDAP server, and then the presentation server will assign them to the corresponding web catalog groups when the user is authenticated using the BI Server. If you’ve organized your web catalog content into these group folders, applying security should be reasonably straightforward as you’ll assign the same permissions to all objects within each group folder. Use the Catalog Manager to set permissions, where you can select “Apply Recursively” to set these permissions on all objects within the group folder.
Sshot-11
Make sure you only ever assign permissions against groups, rather than users, to keep things managable. Even so, setting up web catalog security can get quite complicated, especially once you get down to individual dashboard pages and the like. This posting by Kurt Wolff goes through some of the options and suggests some approaches to make it work.

6. Set subject area permissions using the BI Administration tool, not the Presentation Services Administration screen.

The Presentation Server Administration screen can be used to set access to subject areas, stopping users from creating reports using these subject areas or running reports that reference them.
Sshot-12
My preference though is to set these permissions at the RPD level instead. This keeps all data access permissions in one place (row-level and subject/table/column-level security) and also makes it easy to control access through the groups in your RPD or LDAP server. When you change permissions on these RPD objects you may need to restart the Presentation Server before the restrictions pass through correctly to the Presentation Server – until you do this users who don’t now have permission may still see the subject area listed and may be able to see the table listing, but each of the tables will be empty of columns.
Sshot-13

7. Control access to Presentation Services functions using the Presentation Services administration screen.

Subject area security excepted, the Presentation Services administration screen lets you control whether a user or group can access Answers, Delivers or much lower-level items of functionality, such as which particular views they can include in their requests.
Sshot-14
Again, define groups in the catalog for profiles of users, and use these groups to assign privileges in the web catalog. You can also assign permissions on BI Publisher functionality using the Presentation Server administration screens. Also, as Jeff McQuigg points out, if you’re currently only providing dashboards to users and someone suggests turning Answers on for them, be aware that this might mean that your RPD might need some additional thought before you let users loose on it.

8. Back up your web catalog regularly, and use the Catalog Manager for archiving/restoring catalog entries

You can back-up your whole web catalog by zipping it up and storing it on a backup device. To restore it, unzip the backup and copy it back in its entirety. If you want to archive or backup individual requests, dashboards or group folders, use the Catalog Manager application and select the Archive / Unarchive options.
Sshot-15
Whatever you do, don’t filesystem copy elements of the web catalog and then try and copy them back, as you may hit problems around permissions that only manifest themselves some time later. Also consider using the Content Accelerator Framework (CAF) plug-in to the Catalog Manager to copy reports, dashboards and RPD calculations from one dashboard to another, although as Kevin McGinley points out, this doesn’t make CAF an environment migration tool.

9. Implement the Usage Tracking subject area and reports to monitor web catalog usage

OBIEE 10g now ships with a set of scripts, a predefined RPD and web catalog that you can import into your project to provide statistics on dashboard and request usage. This Oracle by Example article sets out how to install Usage Tracking and once you’ve done so, you can get a good handle on what requests are used most and which users might be having problems. Combine the usage tracking data with ibots and time-series functions, and you can start to generate alerts when key reports are taking longer to run that normal, letting you fix problems with performance before users can report it to you.

10. Implement an “impact analysis” system for your web catalog entries

One thing that’s lacking “out of the box” with OBIEE 10g is any way of measuring the impact, on web catalog entries, from changes to the RPD. You can export a list of reports, subject areas, columns and tables from the Catalog Manager, which gives you a central list of what RPD items are used by what reports.
Sshot-16
You can then view this list on screen, or output it to a file.
Sshot-17
From this list you can then at least see what reports are going to be affected by an RPD change. Within Rittman Mead we have developed an ApEx application that takes this file as an input, parses the RPD and allows us to do an automatic impact analysis; when we get a moment we’ll post details on here together with details on how you can use it on your projects.
So, there’s my “starter for 10″ in terms of web catalog best practices. Do you have any others that you can share? Do you disagree with any that we have come up with, or have a better way to achieve their aim? Have we missed anything off? Just add a comment and we’ll incorporate it into the posting.
Monday, May 30, 2011

Simplifying Migration Process – Changing Environment Specific Variables in RPD


When it comes to migrating repository file between environments (Dev – TEST-Prod), one of the common questions from OBIEE environment administrators is if there is a way to change the connection information without having to change them manually in all the places.
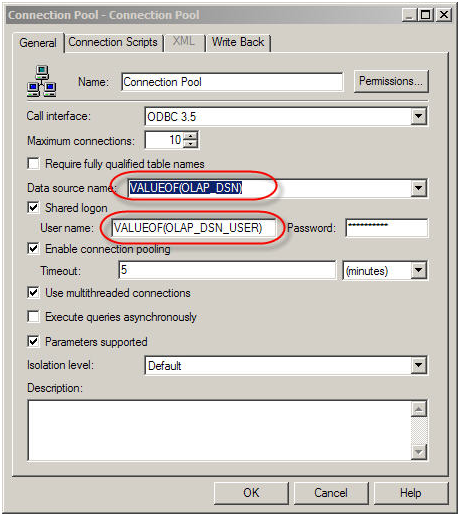
Creating repository variables for DSN and DSN Username solves the issue to an extent. However, imagine having to deal with changing multiple DSNs and their respective usernames. Moreover, there is the setting password to the DSN username. One way to automate the setting of the variables is to store the values in a file and set them via admin tool command line mode.
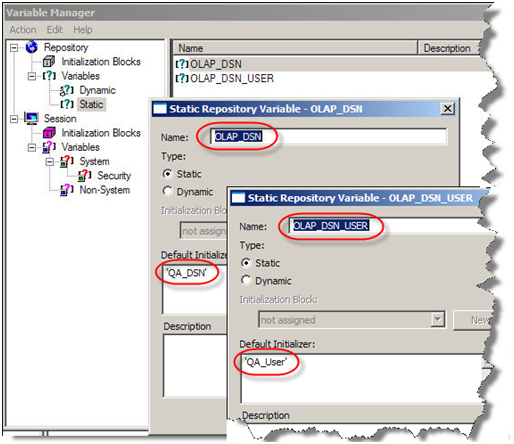
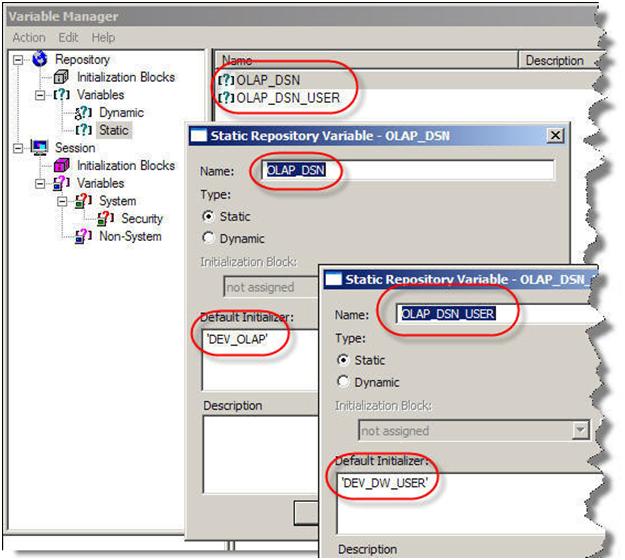
First, define repository variables that can be used in the connection pool.


Reference the DSN information in the connection pool.

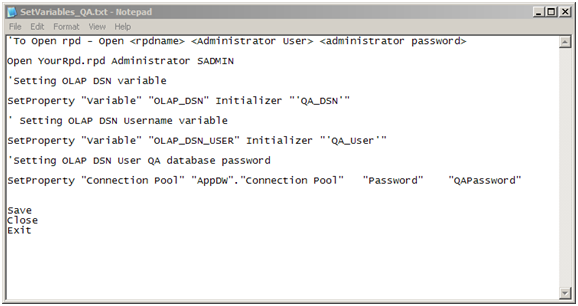
Now create a control file SetVariables.txt with the environment specific values.
_______________
‘To Open rpd – Open <rpdname> <Administrator User> <administrator password>
Open YourRpd.rpd    Administrator     SADMIN
‘Setting OLAP DSN variable
SetProperty    ”Variable”    ”OLAP_DSN”    Initializer    ” ‘QA_DSN’ ”
‘ Setting OLAP DSN Username variable
SetProperty    ”Variable”    ”OLAP_DSN_USER”    Initializer    ” ‘QA_User’ ”
‘Setting OLAP DSN User QA database password
SetProperty “Connection Pool” “AppDW”.”Connection Pool” “Password” “QAPassword”

Save
Close
Exit
______________

Create one per environment.
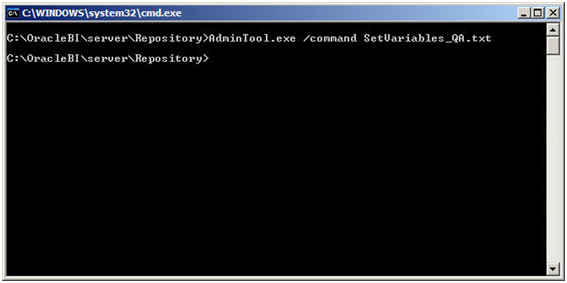
In the command line run the following command:
AdminTool.exe /command SetVariables_QA.txt

And the repository is now prepped for the other environment (QA in this case).


OBIEE Presentation Layer Design Principles/Best Practices


There are certain design principles or best practices oracle suggest in designing the OBIEE repository. If you open any standard/sample repository provided by oracle you will understand what exactly I am talking about
Today we will discuss the design principles for Presentation Layer.
Principle 1.Subject Areas
Do not include all presentation layer objects in a single subject area (Presentation Catalog). While it is possible but still not recommended approach.
Principle 2. Development with End Users in Mind
Always develop the presentation layer so that end users are able to understand and use it.
Principle 3. Role Based Subject Area.
It is always good idea to create presentation catalog to suit the needs of individual users or user types. For ex. create a separate presentation catalog for sales managers because they need to see only an overview of an organization.
Principle 4. Presentation Tables
Presentation Tables should consistent across presentation catalog.
  • List Dimension tables first.
  • Do not mix dimension and fact columns in the same table.
  • Apply consistent ordering and naming conventions for tables and columns across catalogs.
  • Include the words “measure” or “fact” in the names of the fact presentation tables.
Principle 5. Rule of Seven
Keep presentation catalogs small and easy to understand by limiting the number of tables to seven.
Keep Presentation catalogs small and easy to understand by limiting the number of columns to seven.
Principle 6. Fact Tables
Try to limit the presentation catalogs so that there are no more than a couple of fact presentation tables in each catalog. It is important to avoid situation in which there are multiple join paths existing within one presentation catalog.
Principle 7. Implicit Fact Columns
If you have multiple fact presentation tables, it is always best practice to assign an implicit fact column. Implicit facts come into play when an Answers report contains columns from more than one logical dimension table and no explicit facts.
Principle 8. Canonical Time
Canonical time is a useful way for allowing users to report for a specific period of time across multiple star schema. If you use canonical time ,make sure that the corresponding time presentation table is given a very generic  name and that name is consistent across all the presentation catalogs.
It should be the first table in a catalog.
Principle 9. Secondary Time Dimension
This function enables users to build time reports for specific star schema.
Secondary time dimensions can be given their own presentation tables further down the list.We can place all secondary time dimension objects into a single presentation table.
Principle 10. Nesting Presentation Table
Prefix presentation table names with a hyphen to group common objects together into sub folders.
Principle 11. Presentation Object Names & Description
  • Use the Alisa tab to keep track of prior names.
  • Use the default option that synchronize the presentation column name with the underlying logical column name.
  • Use only logical, business -oriented names ( rather than physical object names) in the presentation Layer.

OBIEE Physical Layer Design Principles/Best Practices


There are certain design principles or best practices oracle suggest in designing the OBIEE repository. If you open any standard/sample repository provided by oracle you will understand what exactly I am talking about
Today we will discuss the design principles for physical layers
Principle :Import only needed tables in physical layer and do not create tables manually in physical layer.
Import Tables
Import Tables
Reasons to do that :Its easier to import the table then creating it manually.In that way we are avoiding the table name , column name , data type mis match possibility. Import only those tables which you need. If you need more tables at later stage in project, you can always import them.
You will be using connection pool to import the table and that helps to make sure that connectivity to source database system is working fine.
Principle 2 Create alias for the physical tables
Physical Layer Alias Table
Reasons to do that :
It helps in avoiding the circular joins.
It helps when we have confirm dimension(e.f time dimension) and we want to join dimension different way
Its easier to give the access of objects to users in case of Multi User Development Environment
Alias naming convention helps in easily finding the fact and dimension table in physical layer
We can import the key relationship in physical layer from database and maintain the relationship which is required among the alias tables
Principle Set the cache  property of the physical table
Cache Property of the tables
Reasons to do that
Its better to set the caching at physical table level and not at the alias table level.This applies to most of the scenarios
It your data source is OLTP system make sure you disable to caching. As  that changing frequency would be high and you do not want to cache results.
For all the data warehouse sources have better cache persistence time set
Principle 4 connection pool(s) and its properties
Physical Layer Multiple connection Pool
Reasons to do this.
To have multiple connection pool for difference purpose. e.g for usage tracking, security implementation etc it better to have different connection pools.
COnnection Pool Property
Call interface: Use native call interface for the connection(e.g OCI10g) etc based on source database. Its faster then generic ODBC connection.
set connection pool , time out ,maximum connections etc based on server configurations and usage
connection pooling- it avoids the database connection overhead. If users run the same query it users the same connection from the pool. What does this mean is user sessions share the connection in this.
Maximum Connection :
Max what it should be :Approx 1024 kb of server memory is consumed in each connection.So tThis has to be set per server configuration and requirement.
Min what it should be: 25% of max users times the reports they execute.
e.g if you have 1000 users accessing around 10 reports  in dashboard that this number should 250 ( 25% of 1000) * 10 = 2500
Please leave me a comment if you have lean any other design principal as a hard lesson in your projects

OBIEE BMM Layer Design Principles/Best Practices


OBIEE BMM Layer Design Principles / Best Practices
There are certain design principles or best practices oracle suggest in designing the OBIEE repository. If you open any standard/sample repository provided by oracle you will understand what exactly I am talking about
Today we will discuss the design principles for BMM Layer.
Principle 1. Use Multi User Development Environment
Use the Multi- User Development  facility if there are multiple developers. Multiple developers to connect “online” to the same repository file and making changes is not recommended.
Multi User Development allows user to define a series of projects within the repository file ,where each project is a subset of the entire repository .If developers want to make changes , they can check out a project to a local machine make and test the changes,and then check the modifications back into the master repository file.
Principle 2.  Always run Global Consistency Check before releasing a repository.
Whenever we make changes to a repository ,always be sure to run Global consistency check. It is bad practice to release a repository that still contains consistency check errors. In some cases, consistency errors prevent Oracle BI Server from loading the repository. Use the Consistency check manager to identify and debug check messages.
Principle 3.  Separate Business Model
Even if you have only a single data source or schema in the physical layer, or you have only one physical data source for the repository, it is still good practice to break out the physical objects into multiple business models in the BMM layer to represent the independent areas of functionality.
Principle 4. Logical Tables
When building logical tables, do not merge multiple dimension tables into a single logical dimension table,and do not merge multiple fact tables into a single logical fact table.
Having multiple logical fact tables also makes it easier to create well defined projects for Multi User development.
It is also a good practice to prefix logical table names with either Dim-, Fact- ,or Fact Compound -.
This allows you to easily see how the tables are being used. It also groups the tables in the business model, so that facts are groups with facts, dimensions with dimensions  and so on.
Principle 5. Time Dimension
There are few things to keep in mind in time dimension factor.
  • Always must ensure that time Dimension hierarchy is built correctly and the logical level of each time- logical table source is set correctly
  • If there are multiple time dimensions within the business model, for consistency, make sure that all time dimension logical table contains the same columns and general structure. This is good for reporting purpose.
Principle 6. Logical Fact & Dimension table columns
  • Always assign a primary key for logical dimension tables. All logical dimension columns should be renamed in a way that is meaningful to users.
  • Bring only required columns in to the BMM layer for reporting.
  • Do not assign logical primary key for logical fact tables.
  • Create meaningful name for measures
  • Set aggregation rule for every logical fact columns.
  • Create “dummy” measures to group facts.
Principle 7. Logical Joins
Use only logical(complex ) joins in BMM layer. And always accept default properties when creating joins.
Principle 8. Calculated Measure
Be very careful when building calculated measures.
  • Use logical columns for calculations that require an aggregation rule that is applied before the calculation.
  • Use physical columns for calculations that require an aggregation rule to be applied after the calculation.
Principle 9. Aggregates
Few important things to keep in mind about Aggregates.
  • Try to ensure that each aggregate table has an effective summary ration with underlying detail.
  • Ensure that the logical level of every aggregate logical table source is set correctly.
  • Always test to ensure that aggregates tables are being used as expected.
  • If an aggregates is not used ,try changing the number of elements on one of the related logical dimension levels.
Principle 10. Dimension Hierarchies
In Dimension Hierarchies few things  are very important to keep in mind
  • It is best practice to create dimensional hierarchy for every logical dimension table in BMM layer.
  • All Dimension must have at least two levels : the total level and detail level.
  • If you are creating Dimensional Hierarchy manually, be sure to check Grand total level for the Total Level.
  • Use Update Row Counts or Estimate Levels to set the number of elements for every level of every Dimension Hierarchy.
  • Think about the experience of user when enabling drill down.
Principle 11. Avoid Snowflake schema
When there is Snowflaking in physical model,We should try to avoid Snowflaking in BMM layer and build models that use only star schema .
Use WHERE clause filters to help avoid using opaque views or complex joins in the physical layer.